

代码拉取完成,页面将自动刷新
In symbols one observes an advantage in discovery which is greatest when they express the exact nature of a thing briefly and,
as it were, picture it;
then indeed the labor of thought is wonderfully diminished.

— GOTTFRIED WILHELM LEIBNIZ
要发明,就要挑选恰当的符号,
要做到这一点,就要用含义简明的少量符号来表达和比较忠实地描绘事物的内在本质,
从而最大限度地减少人的思维劳动。

—— 莱布尼茨
We start by presenting ways for configuring logback, with many example configuration scripts. Joran, the configuration framework upon which logback relies will be presented in a later chapter.
我们先通过配置脚本示例来介绍 logback 的配置方法。 后面会介绍 Logback 专属的配置框架: Chapter 11: Joran。
Inserting log requests into the application code requires a fair amount of planning and effort. Observation shows that approximately four percent of code is dedicated to logging. Consequently, even a moderately sized application will contain thousands of logging statements embedded within its code. Given their number, we need tools to manage these log statements.
在程序代码中增加日志请求需要很多工作量。 研究显示,大约百分之四的代码专用于记录日志。 因此,即使普通规模的应用也会在代码中包含上千行日志记录代码。 既然知道了有这么大的数量,我们需要使用工具来管理这些日志代码。
Logback can be configured either programmatically or with a configuration script expressed in XML or Groovy format. By the way, existing log4j users can convert their log4j.properties files to logback.xml using our PropertiesTranslator web-application.
可以通过编程、或者XML格式、Groovy格式的脚本来配置Logback。 顺便说一下,现有的log4j用户可以使用 [PropertiesTranslator](http://logback.qos.ch/translator/)将 log4j.properties 文件转换为 logback.xml。
Let us begin by discussing the initialization steps that logback follows to try to configure itself:
先来看看 Logback 的初始化步骤:
Logback tries to find a file called logback-test.xml in the classpath.
If no such file is found, logback tries to find a file called logback.groovy in the classpath.
If no such file is found, it checks for the file logback.xml in the classpath..
If no such file is found, service-provider loading facility (introduced in JDK 1.6) is used to resolve the implementation of com.qos.logback.classic.spi.Configurator interface by looking up the file META-INF\services\ch.qos.logback.classic.spi.Configurator in the class path. Its contents should specify the fully qualified class name of the desired Configurator implementation.
If none of the above succeeds, logback configures itself automatically using the BasicConfigurator which will cause logging output to be directed to the console.
Logback 先在 classpath 路径中查找名为 logback-test.xml 的文件。
如果找不到, 则在 classpath 路径中查找名为 logback.groovy 的文件。
如果找不到, 则在 classpath 路径中查找名为 logback.xml 的文件。
如果找不到, 则使用 service-provider加载工具, 在 classpath 中查找 META-INF\services\ch.qos.logback.classic.spi.Configurator 文件, 以解析 com.qos.logback.classic.spi.Configurator 接口的实现。 其内容应指定所需 Configurator 实现的完全限定名。
如果以上方法均未成功, 则使用 BasicConfigurator 进行自动配置, 也就是直接将日志信息输出到控制台。
The last step is meant as last-ditch effort to provide a default (but very basic) logging functionality in the absence of a configuration file.
最后一步的目的, 是在没有任何配置文件的情况下, 提供非常基本的日志功能。
If you are using Maven and if you place the logback-test.xml under the src/test/resources folder, Maven will ensure that it won't be included in the artifact produced. Thus, you can use a different configuration file, namely logback-test.xml during testing, and another file, namely, logback.xml, in production.
如果使用 Maven, 并且在 src/test/resources 目录下放置了文件 logback-test.xml, 则 Maven 不会将测试资源包含到打包生成的文件中。
因此,可以放心地在单元测试中使用 logback-test.xml配置文件, 而在生产环境中使用 logback.xml 文件。
FAST START-UP It takes about 100 miliseconds for Joran to parse a given logback configuration file. To shave off those miliseconds at aplication start up, you can use the service-provider loading facility (item 4 above) to load your own custom Configurator class with BasicConfigrator serving as a good starting point.
在 Joran 中, 解析给定的logback配置文件只需要 100 毫秒左右。
要在程序启动时减少这个时间, 可以使用 service-provider 加载工具(对应前面的第4步), 通过 BasicConfigrator 加载自定义的 Configurator 类。
The simplest way to configure logback is by letting logback fall back to its default configuration. Let us give a taste of how this is done in an imaginary application called MyApp1.
Logback 最简单的配置方式,就是使用默认配置。
Example: Simple example of BasicConfigurator usage (logback-examples/src/main/java/chapters/configuration/MyApp1.java)
下面我们来看使用默认配置的示例代码:
MyApp1.java
package chapters.configuration;

import org.slf4j.Logger;
import org.slf4j.LoggerFactory;

public class MyApp1 {
  final static Logger logger = LoggerFactory.getLogger(MyApp1.class);

  public static void main(String[] args) {
    logger.info("Entering application.");

    Foo foo = new Foo();
    foo.doIt();
    logger.info("Exiting application.");
  }
}
This class defines a static logger variable. It then instantiates a Foo object. The Foo class is listed below:
代码很简单, 先定义了一个 static 的 logger变量, 然后在 main 方法中创建了一个 Foo 对象并调用方法。
Example: Small class doing logging (logback-examples/src/main/java/chapters/configuration/Foo.java)
Foo类的代码如下:
Foo.java
package chapters.configuration;

import org.slf4j.Logger;
import org.slf4j.LoggerFactory;

public class Foo {
  static final Logger logger = LoggerFactory.getLogger(Foo.class);

  public void doIt() {
    logger.debug("Did it again!");
  }
}
In order to run the examples in this chapter, you need to make sure that certain jar files are present on the class path. Please refer to the setup page for further details.
如果程序跑不起来,你需要确保在 class path 中存在必须的jar文件。 详情请参考 setup page。
Assuming the configuration files logback-test.xml or logback.xml are not present, logback will default to invoking BasicConfigurator which will set up a minimal configuration. This minimal configuration consists of a ConsoleAppender attached to the root logger. The output is formatted using a PatternLayoutEncoder set to the pattern %d{HH:mm:ss.SSS} [%thread] %-5level %logger{36} - %msg%n. Moreover, by default the root logger is assigned the DEBUG level.
假设没有 logback-test.xml, 也没有 logback.xml 配置文件,则 logback 默认调用 BasicConfigurator 来进行最简单的配置。
此最简配置将 ConsoleAppender 挂载为 root logger。
使用 PatternLayoutEncoder 将输出格式设置为 %d{HH:mm:ss.SSS} [%thread] %-5level %logger{36} - %msg%n。
root logger 的日志级别默认设置为 DEBUG 级别。
Thus, the output of the command java chapters.configuration.MyApp1 should be similar to:
因此,MyApp1程序执行后的输出内容类似于:
16:06:09.031 [main] INFO  chapters.configuration.MyApp1 - Entering application.
16:06:09.046 [main] DEBUG chapters.configuration.Foo - Did it again!
16:06:09.046 [main] INFO  chapters.configuration.MyApp1 - Exiting application.
Except code that configures logback (if such code exists) client code does not need to depend on logback. Applications that use logback as their logging framework will have a compile-time dependency on SLF4J but not logback.
程序中一般不需要依赖 Logback, 除非明确需要配置 logback。 使用logback作为日志记录框架的应用程序, 在编译时只需要依赖 SLF4J 即可。
The MyApp1 application links to logback via calls to org.slf4j.LoggerFactory and org.slf4j.Logger classes, retrieve the loggers it wishes to use, and chugs on. Note that the only dependencies of the Foo class on logback are through org.slf4j.LoggerFactory and org.slf4j.Logger imports. Except code that configures logback (if such code exists) client code does not need to depend on logback. Since SLF4J permits the use of any logging framework under its abstraction layer, it is easy to migrate large bodies of code from one logging framework to another.
应用程序 MyApp1 通过 org.slf4j.LoggerFactory 和 org.slf4j.Logger 类来链接到Logback,检索到希望使用的日志记录器并启动。
请注意这里的 Foo 类唯一依赖的是 org.slf4j.LoggerFactory 和 org.slf4j.Logger 类。
由于SLF4J允许在其抽象层下使用任何一种日志记录框架, 因此很容易将系统从一个日志框架迁移到另一个日志框架。
logback-test.xml or logback.xml
logback-test.xml 或者 logback.xml 配置LogbackAs mentioned earlier, logback will try to configure itself using the files logback-test.xml or logback.xml if found on the class path. Here is a configuration file equivalent to the one established by BasicConfigurator we've just seen.
前面说过,如果在 class path 中找到 logback-test.xml 或者 logback.xml 文件,则Logback会用他们来作为配置文件。
Example: Basic configuration file (logback-examples/src/main/resources/chapters/configuration/sample0.xml)
示例:
文件名
logback.xml或者logback-test.xml
<configuration>

  <appender name="STDOUT" class="ch.qos.logback.core.ConsoleAppender">
    <!-- encoders are assigned the type
         ch.qos.logback.classic.encoder.PatternLayoutEncoder by default -->
    <encoder>
      <pattern>%d{HH:mm:ss.SSS} [%thread] %-5level %logger{36} - %msg%n</pattern>
    </encoder>
  </appender>

  <root level="debug">
    <appender-ref ref="STDOUT" />
  </root>
</configuration>
After you have renamed sample0.xml as logback.xml (or logback-test.xml) place it into a directory accessible from the class path. Running the MyApp1 application should give identical results to its previous run.
这个文件只要在 classpath 中,执行上面的程序 MyApp1,输出结果应该是等价的。如果稍微修改一下 <pattern> 部分,则会看到不同的结果。
当然,根据名字中的含义,我们也能推断出, logback-test.xml 一般只在test时加入class path,对应 maven 中的 test/resources 目录。
If warning or errors occur during the parsing of the configuration file, logback will automatically print its internal status messages on the console.
如果在解析配置文件时产生警告或错误信息, 则Logback会自动将其内部状态打印到控制台。
If warnings or errors occur during the parsing of the configuration file, logback will automatically print its internal status data on the console. Note that to avoid duplication, automatic status printing is disabled if the user explicitly registers a status listener (defined below).
为了避免重复输出,如果用户手工注册了状态监听器,则会禁用自动状态打印。 具体示例请参考下文。
In the absence of warnings or errors, if you still wish to inspect logback's internal status, then you can instruct logback to print status data by invoking the print() of the StatusPrinter class. The MyApp2 application shown below is identical to MyApp1 except for the addition of two lines of code for printing internal status data.
在没有警告或错误的情况下,如果仍然希望检查logback的内部状态,那么可以调用 StatusPrinter.print() 方法来让 logback打印自身状态信息。
下面所示的应用程序“MyApp2”与“MyApp1”基本相同,只是添加了两行代码来打印内部状态数据。
Example: Print logback's internal status information (logback-examples/src/main/java/chapters/configuration/MyApp2.java)
示例: 打印Logback的内部状态
MyApp2.java
import ch.qos.logback.classic.LoggerContext;
import ch.qos.logback.core.util.StatusPrinter;
import org.slf4j.Logger;
import org.slf4j.LoggerFactory;

public class MyApp2 {
    final static Logger logger = LoggerFactory.getLogger(MyApp2.class);

    public static void main(String[] args) {
        // 在使用Logback作为日志框架的情况下
        LoggerContext lc = (LoggerContext) LoggerFactory.getILoggerFactory();
        // 打印 logback 内部状态
        StatusPrinter.print(lc);
        //
        // ... 同MyApp1 的内容
        logger.info("Entering application.");
        Foo foo = new Foo();
        foo.doIt();
        logger.info("Exiting application.");
    }
}
If everything goes well, you should see the following output on the console.
如果不报错, 则输出内容类似如下:
17:44:58,578 |-INFO in ch.qos.logback.classic.LoggerContext[default] - Found resource [logback-test.xml]
17:44:58,671 |-INFO in ch.qos.logback.classic.joran.action.ConfigurationAction - debug attribute not set
17:44:58,671 |-INFO in ch.qos.logback.core.joran.action.AppenderAction - About to instantiate appender of type [ch.qos.logback.core.ConsoleAppender]
17:44:58,687 |-INFO in ch.qos.logback.core.joran.action.AppenderAction - Naming appender as [STDOUT]
17:44:58,812 |-INFO in ch.qos.logback.core.joran.action.AppenderAction - Popping appender named [STDOUT] from the object stack
17:44:58,812 |-INFO in ch.qos.logback.classic.joran.action.LevelAction - root level set to DEBUG
17:44:58,812 |-INFO in ch.qos.logback.core.joran.action.AppenderRefAction - Attaching appender named [STDOUT] to Logger[root]

17:44:58.828 [main] INFO  chapters.configuration.MyApp2 - Entering application.
17:44:58.828 [main] DEBUG chapters.configuration.Foo - Did it again!
17:44:58.828 [main] INFO  chapters.configuration.MyApp2 - Exiting application.
At the end of this output, you can recognize the lines that were printed in the previous example. You should also notice the logback's internal messages, a.k.a. Status objects, which allow convenient access to logback's internal state.
在日志输出内容的末尾,可以发现之前的示例中的输出内容。 通过这个示例,我们可以看到Logback的内部状态,实际上这是使用一个 Status 对象来包装的。
Enabling output of status data usually goes a long way in the diagnosis of issues with logback. As such, it is highly recommended and should be considered as a recourse of first resort.
启用状态数据的输出, 对于诊断logback问题很有帮助。 因此官方强烈建议将其作为“优先”手段。
Instead of invoking StatusPrinter programmatically from your code, you can instruct the configuration file to dump status data, even in the absence of errors. To achieve this, you need to set the debug attribute of the configuration element, i.e. the top-most element in the configuration file, as shown below. Please note that this debug attribute relates only to the status data. It does not affect logback's configuration otherwise, in particular with respect to logger levels. (If you are asking, no, the root logger will not be set to DEBUG.)
除了通过代码调用 StatusPrinter 来输出状态信息,还可以通过配置文件来导出Logback状态数据, 即使没有错误也会输出。
我们只需要设置最顶层的 configuration 元素属性 debug="true"即可, 请参考下面的示例代码。
请注意,这个 debug 属性只用于输出Logback的状态数据, 并不会影响logback的日志配置,也不会影响到程序的日志级别。
(也就是说,root logger 并 不会 被这个属性设置为 DEBUG 级别。)
Example: Basic configuration file using debug mode (logback-examples/src/main/resources/chapters/configuration/sample1.xml)
示例配置文件:
logback.xml
<configuration debug="true">

  <appender name="STDOUT" class="ch.qos.logback.core.ConsoleAppender">
    <!-- encoders are  by default assigned the type
         ch.qos.logback.classic.encoder.PatternLayoutEncoder -->
    <encoder>
      <pattern>%d{HH:mm:ss.SSS} [%thread] %-5level %logger{36} - %msg%n</pattern>
    </encoder>
  </appender>

  <root level="debug">
    <appender-ref ref="STDOUT" />
  </root>
</configuration>
Setting debug="true" within the <configuration> element will output status information, assuming that:
设置 <configuration> 元素的属性 debug="true",则会自动输出状态信息。 当然,配置文件必须能被Logback扫描到,并且没有格式错误。
If any of these two conditions is not fulfilled, Joran cannot interpret the debug attribute since the configuration file cannot be read. If the configuration file is found but is malformed, then logback will detect the error condition and automatically print its internal status on the console. However, if the configuration file cannot be found, logback will not automatically print its status data, since this is not necessarily an error condition. Programmatically invoking StatusPrinter.print() as shown in the MyApp2 application above ensures that status information is printed in every case.
如果没有扫描到配置文件,或者配置文件的格式不对,则Joran就不能正确解析 debug 属性。
如果找到了配置文件,但格式不正确,那么logback将检测错误条件并在控制台上自动打印其内部状态。
但如果找不到配置文件,logback就不会自动打印其状态数据,因为没有配置文件你不能说它出错了。
前面的应用程序 MyApp2 中,因为是以代码直接调用的 StatusPrinter.print(), 不管什么情况都会打印出基本的状态信息。
FORCING STATUS OUTPUT In the absence of status messages, tracking down a rogue logback.xml configuration file can be difficult, especially in production where the application source cannot be easily modified. To help identify the location of a rogue configuration file, you can set a StatusListener via the "logback.statusListenerClass" system property (defined below) to force output of status messages. The "logback.statusListenerClass" system property can also be used to silence output automatically generated in case of errors.
在没有状态信息的情况下“强制状态输出”,跟踪恶意的 logback.xml 配置文件可能很困难,特别是在生产环境中,因为来回修改系统代码并不容易。
为了帮助识别恶意配置文件的位置,我们可以通过系统属性 "logback.statusListenerClass" 设置 “StatusListener”, 强制输出状态消息。
"logback.statusListenerClass" 系统属性还可以用来在出现错误时自动生成静默输出。
By the way, setting debug="true" is strictly equivalent to installing an OnConsoleStatusListener. Status listeners are disccussed further below. The installation of OnConsoleStatusListener is shown next.
顺便说一下,设置 debug="true" 严格来说等同于加载了 OnConsoleStatusListener。
下面将进一步讨论状态监听器。
Example: Registering a status listener (logback-examples/src/main/resources/chapters/configuration/onConsoleStatusListener.xml)
装载 OnConsoleStatusListener 的示例: 注册状态监听器
logback.xml
<configuration>
  <statusListener class="ch.qos.logback.core.status.OnConsoleStatusListener" />

  ... the rest of the configuration file
</configuration>
Enabling output of status data, either via the debug attribute or equivalently by installing OnConsoleStatusListener, will go a long way in helping you diagnose logback issues. As such, enabling logback status data is very highly recommended and should be considered as a recourse of first resort.
通过设置 <configuration> 元素的属性 debug="true", 或者安装OnConsoleStatusListener, 都可以启用Logback状态数据的输出。
这非常有利于我们诊断 logback 问题。 因此官方强烈建议启用logback状态数据,并将其作为“第一”手段。
You may specify the location of the default configuration file with a system property named "logback.configurationFile". The value of this property can be a URL, a resource on the class path or a path to a file external to the application.
我们可以使用名为 "logback.configurationFile" 的系统属性来指定默认配置文件的位置。 属性值可以是URL、class path 上的资源, 或者外部文件的路径。
示例如下:
java -Dlogback.configurationFile=/path/to/config.xml chapters.configuration.MyApp1
Note that the file extension must be ".xml" or ".groovy". Other extensions are ignored. Explicitly registering a status listener may help debugging issues locating the configuration file.
需要注意的是,配置文件名必须以 ".xml" 或者 ".groovy" 结尾。其他后缀名的文件则会被忽略。
明确指定状态监听器,有助于调试配置文件的位置。 请参考前面的小节。
Given that "logback.configurationFile" is a Java system property, it may be set within your application as well. However, the system property must be set before any logger instance is created.
系统属性 "logback.configurationFile" 可以通过命令行指定, 当然也可以在程序中配置,只要保证在所有 logger 实例创建之前设置好即可。
示例代码如下:
import ch.qos.logback.classic.util.ContextInitializer;

public class ServerMain {
    public static void main(String args[]) throws IOException, InterruptedException {
       // 设置系统熟悉必须再所有  LoggerFactory.getLogger() 调用之前;
       // ContextInitializer.CONFIG_FILE_PROPERTY 是个字符串常量,值是 "logback.configurationFile"
       System.setProperty(ContextInitializer.CONFIG_FILE_PROPERTY, "/path/to/config.xml");
       ...
    }
}
Logback-classic can scan for changes in its configuration file and automatically reconfigure itself when the configuration file changes.
Logback-classic 可以扫描配置文件中的变更,并在配置文件更改时自动重新配置自身。
If instructed to do so, logback-classic will scan for changes in its configuration file and automatically reconfigure itself when the configuration file changes. In order to instruct logback-classic to scan for changes in its configuration file and to automatically re-configure itself set the scan attribute of the <configuration> element to true, as shown next.
Example: Scanning for changes in configuration file and automatic re-configuration (logback-examples/src/main/resources/chapters/configuration/scan1.xml)
如果需要自动重新加载配置文件,可以将 <configuration> 元素的 scan 属性设置为 true,示例如下:
<configuration scan="true">
  ...
</configuration>
By default, the configuration file will be scanned for changes once every minute. You can specify a different scanning period by setting the scanPeriod attribute of the <configuration> element. Values can be specified in units of milliseconds, seconds, minutes or hours. Here is an example:
Example: Specifying a different scanning period (logback-examples/src/main/resources/chapters/configuration/scan2.xml)
默认情况下,每分钟扫描一次配置文件。
也可以通过 <configuration> 元素的 scanPeriod 属性来指定不同的扫描周期。可以指定单位 milliseconds, seconds, minutes 以及 hours 。
示例如下:
<configuration scan="true" scanPeriod="30 seconds" >
  ...
</configuration>
NOTE If no unit of time is specified, then the unit of time is assumed to be milliseconds, which is usually inappropriate. If you change the default scanning period, do not forget to specify a time unit.
如果没有指定时间单位,则默认时间单位为毫秒,这一般是不合适的。 所以如果修改了默认的扫描周期,请务必指定时间单位。
Behind the scenes, when you set the scan attribute to true, a ReconfigureOnChangeTask will be installed. This task run in a separate thread and will check whether your configuration file has changed. ReconfigureOnChangeTask will automatically watch for any included files as well.
如果我们将scan属性设置为true,则会启动一个 ReconfigureOnChangeTask。 此任务在单独的线程中运行,并检查配置文件是否更改。 ReconfigureOnChangeTask 也会自动监测所有的配置文件,请参考下文。
As it is easy to make errors while editing a configuration file, in case the latest version of the configuration file has XML syntax errors, it will fall back to a previous configuration file free of XML syntax errors.
由于在编辑配置文件时很容易出错,比如新保存的配置文件有XML语法错误,则会自动回退到之前没有XML语法错误的版本。
While useful, packaging data is expensive to compute, especially in applications with frequent exceptions.
NOTE As of version 1.1.4, packaging data is disabled by default.
虽然jar包信息在排查问题时很有用,但计算成本也很高,尤其是在经常抛出异常的应用中。
请注意: 从 1.1.4 版本开始,默认禁用jar包信息输出。
If instructed to do so, logback can include packaging data for each line of the stack trace lines it outputs. Packaging data consists of the name and version of the jar file whence the class of the stack trace line originated. Packaging data can be very useful in identifying software versioning issues. However, it is rather expensive to compute, especially in application where exceptions are thrown frequently. Here is a sample output:
如果确实需要输出jar包信息,logback可以在调用链的每一行中输出jar包信息。
jar包信息由 jar文件的名称+版本号 组成,表明调用栈中这一行信息对应的类是从这个文件中加载的。
在识别软件版本问题和jar包冲突时,jar包信息非常有用。
然而,计算起来开销也很大,特别是在频繁抛出异常的系统中。
下面是一个开启jar包信息输出的示例:
14:28:48.835 [btpool0-7] INFO  c.q.l.demo.prime.PrimeAction - 99 is not a valid value
java.lang.Exception: 99 is invalid
  at ch.qos.logback.demo.prime.PrimeAction.execute(PrimeAction.java:28) [classes/:na]
  at org.apache.struts.action.RequestProcessor.processActionPerform(RequestProcessor.java:431) [struts-1.2.9.jar:1.2.9]
  at org.apache.struts.action.RequestProcessor.process(RequestProcessor.java:236) [struts-1.2.9.jar:1.2.9]
  at org.apache.struts.action.ActionServlet.doPost(ActionServlet.java:432) [struts-1.2.9.jar:1.2.9]
  at javax.servlet.http.HttpServlet.service(HttpServlet.java:820) [servlet-api-2.5-6.1.12.jar:6.1.12]
  at org.mortbay.jetty.servlet.ServletHolder.handle(ServletHolder.java:502) [jetty-6.1.12.jar:6.1.12]
  at ch.qos.logback.demo.UserServletFilter.doFilter(UserServletFilter.java:44) [classes/:na]
  at org.mortbay.jetty.servlet.ServletHandler$CachedChain.doFilter(ServletHandler.java:1115) [jetty-6.1.12.jar:6.1.12]
  at org.mortbay.jetty.servlet.ServletHandler.handle(ServletHandler.java:361) [jetty-6.1.12.jar:6.1.12]
  at org.mortbay.jetty.webapp.WebAppContext.handle(WebAppContext.java:417) [jetty-6.1.12.jar:6.1.12]
  at org.mortbay.jetty.handler.ContextHandlerCollection.handle(ContextHandlerCollection.java:230) [jetty-6.1.12.jar:6.1.12]
Packaging data is disabled by default but can be enabled by configuration:
默认关闭,但我们可以通过以下配置开启:
<configuration packagingData="true">
  ...
</configuration>
Alternatively, packaging data can be enabled/disabled programmatically by invoking the setPackagingDataEnabled(boolean) method in LoggerContext, as shown next:
当然, 我们也可以在代码中调用 LoggerContext 的方法进行开启和关闭:
LoggerContext lc = (LoggerContext) LoggerFactory.getILoggerFactory();
lc.setPackagingDataEnabled(true);
JoranConfigurator directlyJoranConfigurator
Logback relies on a configuration library called Joran, part of logback-core. Logback's default configuration mechanism invokes JoranConfigurator on the default configuration file it finds on the class path. If you wish to override logback's default configuration mechanism for whatever reason, you can do so by invoking JoranConfigurator directly. The next application, MyApp3, invokes JoranConfigurator on a configuration file passed as a parameter.
Logback 的底层配置库叫做 Joran,它也是logback-core的一部分。
Logback的默认配置机制是使用 class path 中找到的默认配置文件来调用 JoranConfigurator。
如果由于某种原因需要覆盖logback的默认配置机制,可以直接在代码中调用 JoranConfigurator 来实现。
下面的程序 MyApp3 将配置文件作为参数传递给 JoranConfigurator。
Example: Invoking JoranConfigurator directly (logback-examples/src/main/java/chapters/configuration/MyApp3.java)
示例:
MyApp3.java
package chapters.configuration;

import org.slf4j.Logger;
import org.slf4j.LoggerFactory;

import ch.qos.logback.classic.LoggerContext;
import ch.qos.logback.classic.joran.JoranConfigurator;
import ch.qos.logback.core.joran.spi.JoranException;
import ch.qos.logback.core.util.StatusPrinter;

public class MyApp3 {
  final static Logger logger = LoggerFactory.getLogger(MyApp3.class);

  public static void main(String[] args) {
    // 当前程序中需要使用 logback 作为 SLF4J 的日志实现
    LoggerContext context = (LoggerContext) LoggerFactory.getILoggerFactory();

    try {
      JoranConfigurator configurator = new JoranConfigurator();
      configurator.setContext(context);
      // 执行 context.reset() 来清空之前的配置, 比如默认配置:
      // 如果是 multi-step 配置, 则不能使用 context.reset() 调用.
      context.reset();
      configurator.doConfigure(args[0]);
    } catch (JoranException je) {
      // 参考 StatusPrinter 处理上下文异常
    }
    // StatusPrinter 处理上下文异常
    StatusPrinter.printInCaseOfErrorsOrWarnings(context);

    logger.info("Entering application.");

    Foo foo = new Foo();
    foo.doIt();
    logger.info("Exiting application.");
  }
}
This application fetches the LoggerContext currently in effect, creates a new JoranConfigurator, sets the context on which it will operate, resets the logger context, and then finally asks the configurator to configure the context using the configuration file passed as a parameter to the application. Internal status data is printed in case of warnings or errors. Note that for multi-step configuration, context.reset() invocation should be omitted.
程序先获取当前生效的 LoggerContext,
然后将这个context设置为新创建的JoranConfigurator实例的上下文,
并重置logger context,
最终让配置器使用main参数传递的配置文件名称来配置上下文。
如果出现警告或错误,则打印内部状态数据。
注意,对于多步配置,则应该省略 context.reset()调用。
Logback collects its internal status data in a StatusManager object, accessible via the LoggerContext.
Given a StatusManager you can access all the status data associated with a logback context. To keep memory usage at reasonable levels, the default StatusManager implementation stores the status messages in two separate parts: the header part and the tail part. The header part stores the first H status messages whereas the tail part stores the last T messages. At present time H=T=150, although these values may change in future releases.
Logback-classic ships with a servlet called ViewStatusMessagesServlet. This servlet prints the contents of the StatusManager associated with the current LoggerContext as an HTML table. Here is sample output.
Logback 将内部状态信息收集到一个 StatusManager 对象中,可通过 LoggerContext 来读取。
可以通过 StatusManager 获取上下文中所有的状态数据。
为了合理使用内存,StatusManager 的默认实现将状态信息分为: header 和 tail 两个部分。
header 部分存储最早的 H 个状态消息,而 tail 部分存储最近的 T 个消息。
目前的版本中, H=T=150; 在将来的发行版中这些值可能会有变化。
Logback-classic 附带了一个称为 ViewStatusMessagesServlet 的servlet。 这个Servlet将与当前 LoggerContext 关联的 StatusManager 内容输出为 HTML table。
下图是输出示例。

相关的配置示例如下所示:
  <servlet>
    <servlet-name>ViewStatusMessages</servlet-name>
    <servlet-class>ch.qos.logback.classic.ViewStatusMessagesServlet</servlet-class>
  </servlet>

  <servlet-mapping>
    <servlet-name>ViewStatusMessages</servlet-name>
    <url-pattern>/lbClassicStatus</url-pattern>
  </servlet-mapping>
The ViewStatusMessages servlet will be viewable at the URL http://host/yourWebapp/lbClassicStatus
然后可以通过 URL 来访问, 形如: http://host/yourWebapp/lbClassicStatus
You may also attach a StatusListener to a StatusManager so that you can take immediate action in response to status messages, especially to messages occurring after logback configuration. Registering a status listener is a convenient way to supervise logback's internal state without human intervention.
Logback ships with a StatusListener implementation called OnConsoleStatusListener which, as its name indicates, prints all new incoming status messages on the console.
Here is sample code to register an OnConsoleStatusListener instance with the StatusManager.
在 StatusManager 上添加 StatusListener,可以在收到状态消息时执行某些操作或响应,比如在 Logback 配置信息修改之后。
注册状态监听是一种监视内部状态变化的自动化方法,无需人工干预。
Logback 内置了一个 StatusListener 的实现, 名为 OnConsoleStatusListener, 顾名思义,会将所有“新”传入的状态消息打印到控制台。
示例如下:
   LoggerContext lc = (LoggerContext) LoggerFactory.getILoggerFactory();
   StatusManager statusManager = lc.getStatusManager();
   OnConsoleStatusListener onConsoleListener = new OnConsoleStatusListener();
   statusManager.add(onConsoleListener);
Note that the registered status listener will only receive status events subsequent to its registration. It will not receive prior messages. Thus, it is usually a good idea to place status listener registration directives at top of the configuration file before other directives.
It is also possible to register one or more status listeners within a configuration file. Here is an example.
Example: Registering a status listener (logback-examples/src/main/resources/chapters/configuration/onConsoleStatusListener.xml)
请注意,状态监听器只会收到注册成功之后的事件,也就是说不会收到以前的消息。 因此,最好将状态监听的注册指令放置在配置文件的顶部,然后再放置其他指令。
下面是在配置文件中注册状态监听的示例:
<configuration>
  <statusListener class="ch.qos.logback.core.status.OnConsoleStatusListener" />

  ... the rest of the configuration file
</configuration>
One may also register a status listener by setting the "logback.statusListenerClass" Java system property to the name of the listener class you wish to register. For example,
java -Dlogback.statusListenerClass=ch.qos.logback.core.status.OnConsoleStatusListener ...
Logback ships with several status listener implementations. OnConsoleStatusListener prints incoming status messages on the console, i.e. on System.out. OnErrorConsoleStatusListener prints incoming status messages on System.err. NopStatusListener drops incoming status messages.
Note that automatic status printing (in case of errors) is disabled if any status listener is registered during configuration and in particular if the user specifies a status listener via the "logback.statusListenerClass" system. Thus, by setting NopStatusListener as a status listener, you can silence internal status printing altogether.
logback.statusListenerClass"我们也可以通过Java的系统属性 "logback.statusListenerClass" 来指定需要注册的监听器类名。例如:
java -Dlogback.statusListenerClass=ch.qos.logback.core.status.OnConsoleStatusListener ...
Logback 内置了几个状态监听器:
请注意,如果注册了状态监听,则会禁用自动状态信息打印。 特别是在启动程序时指定了 "logback.statusListenerClass" 系统属性。
因此,如果将 NopStatusListener 设置为状态监听器, 则可以完全屏蔽Logback内部的状态信息打印。
示例如下:
java -Dlogback.statusListenerClass=ch.qos.logback.core.status.NopStatusListener ...
In order to release the resources used by logback-classic, it is always a good idea to stop the logback context. Stopping the context will close all appenders attached to loggers defined by the context and stop any active threads in an orderly way. Please also read the section on "shutdown hooks" just below.
为了释放 logback-classic 使用的资源,关闭 logback 上下文是一个好办法。 停止上下文将关闭该上下文上的 appenders 和 loggers,并以有序的方式停止所有活动线程。 详情请参考下面的 “关闭钩子” 小节。
import org.sflf4j.LoggerFactory;
import ch.qos.logback.classic.LoggerContext;
...

// assume SLF4J is bound to logback-classic in the current environment
LoggerContext loggerContext = (LoggerContext) LoggerFactory.getILoggerFactory();
loggerContext.stop();
In web-applications the above code could be invoked from within the contextDestroyed method of ServletContextListener in order to stop logback-classic and release resources. Starting with version 1.1.10, the appropriate ServletContextListener is installed automatically for you (see just below).
在Web应用程序中,可以在 ServletContextListener 的 contextDestroyed 方法中内调用上面的代码,以停止 logback-classic 并释放资源。
从1.1.10版本开始,则会自动注册 ServletContextListener, 请参考下文。
Installing a JVM shutdown hook is a convenient way for shutting down logback and releasing associated resources.
注册JVM的关闭钩子,可以很方便地关闭 logback 并释放相关的资源。
<configuration debug="true">
   <!-- 如果不指定 class 属性,则默认为:
   ch.qos.logback.core.hook.DefaultShutdownHook -->
   <shutdownHook/>
  ....
</configuration>
Note that you may install a shutdown hook of your own making by setting the class attribute to correspond to your shutdown hook's class name.
The default shutdown hook, namely DefaultShutdownHook, will stop the logback context after a specified delay (0 by default). Stopping the context will allow up to 30 seconds for any log file compression tasks running in the background to finish. In standalone Java applications, adding a directive to your configuration file is an easy way to ensure that any ongoing compression tasks are allowed to finish before JVM exit. In applications within a Web server, webShutdownHook will be installed automatically making directive quite redundant and unnecessary.
请注意, 我们也可以将 class 属性设置为自定义的类,来自己实现相关的关机钩子。
默认的关闭挂钩,即[DefaultShutdownHook](http://logback.qos.ch/apidocs/ch/qos/logback/core/hook/DefaultShutdownHook.html),将在指定的延迟(0之后 默认情况下)。 停止上下文将使在后台运行的任何日志文件压缩任务最多需要30秒才能完成。 在独立的Java应用程序中,向配置文件中添加`指令是确保JVM退出之前允许任何正在进行的压缩任务完成的简便方法。 在Web服务器中的应用程序中,将自动安装[webShutdownHook](http://logback.qos.ch/manual/configuration.html#webShutdownHook),从而使``指令变得非常多余和不必要。
SINCE 1.1.10 Logback-classic will automatically ask the web-server to install a LogbackServletContainerInitializer implementing the ServletContainerInitializer interface (available in servlet-api 3.x and later). This initializer will in turn install and instance of LogbackServletContextListener. This listener will stop the current logback-classic context when the web-app is stopped or reloaded.
You may disable the automatic the installation of LogbackServletContextListener by setting a named logbackDisableServletContainerInitializer in your web-application's web.xml file. Here is the relevant snippet.
Logback-classic从1.1.10版本开始,实现了 ServletContainerInitializer 接口的 LogbackServletContainerInitializer, 会被servlet-api 3.x及更高版本的Web服务器自动加载。
该初始化程序将创建 LogbackServletContextListener 实例。 当Web应用停止或重新加载时,listener会关闭当前的 logback-classic 上下文。
可以在 web.xml 文件中设置名为 logbackDisableServletContainerInitializer 的 <context-param> 来禁止自动安装 LogbackServletContextListener。 示例代码如下:
<web-app>
    <context-param>
        <param-name>logbackDisableServletContainerInitializer</param-name>
        <param-value>true</param-value>
    </context-param>
    ....
</web-app>
Note that logbackDisableServletContainerInitializer variable can also be set as a Java system property an OS environment variable. The most local setting has priority, i.e. web-app first, system property second and OS environment last.
请注意,logbackDisableServletContainerInitializer 变量也可以通过喜欢环境变量、或者Java系统属性来设置。
范围最小的变量优先级最高,也就是说,最优先的是Web应用,其次是系统属性,最后是操作系统的环境变量。
As you have seen thus far in the manual with plenty of examples still to follow, logback allows you to redefine logging behavior without needing to recompile your code. Indeed, you can easily configure logback so as to disable logging for certain parts of your application, or direct output to a UNIX Syslog daemon, to a database, to a log visualizer, or forward logging events to a remote logback server, which would log according to local server policy, for example by forwarding the log event to a second logback server.
The remainder of this section presents the syntax of configuration files.
As will be demonstrated over and over, the syntax of logback configuration files is extremely flexible. As such, it is not possible to specify the allowed syntax with a DTD file or an XML schema. Nevertheless, the very basic structure of the configuration file can be described as, <configuration> element, containing zero or more <appender> elements, followed by zero or more <logger> elements, followed by at most one <root> element. The following diagram illustrates this basic structure.

If you are unsure which case to use for a given tag name, just follow the camelCase convention which is almost always the correct convention.
到目前为止,我们已经看到了很多示例配置, logback支持重新定义日志行为,而无需重新编译代码。 确实,可以轻松配置logback, 来实现:
本节接下来的部分将介绍配置文件的语法格式。
正如我们一再强调的那样,logback配置文件的语法非常灵活。 因此,也就不能用 DTD文件或XML schema 来指定其允许的语法。 尽管如此,配置文件的基本结构可以描述为:
<configuration>元素,包含0到多个<appender>元素,后面跟着0到多个<logger>元素,然后是最多包含一个<root>元素。
下图说明了这种基本结构。
如果不确定某个标签的大小写格式,只需遵循 [驼峰标识(camelCase)](https://zh.wikipedia.org/zh-cn/%E9%A9%BC%E5%B3%B0%E5%BC%8F%E5%A4%A7%E5%B0%8F%E5%86%99)即可, 一般来说都是正确的。
Since logback version 0.9.17, tag names pertaining to explicit rules are case insensitive. For example, <logger>, <Logger> and <LOGGER> are valid configuration elements and will be interpreted in the same way. Note that XML well-formedness rules still apply, if you open a tag as <xyz> you must close it as </xyz>, </XyZ> will not work.
As for implicit rules, tag names are case sensitive except for the first letter. Thus, <xyz> and <Xyz> are equivalent but not <xYz>. Implicit rules usually follow the camelCase convention, common in the Java world. Since it is not easy to tell when a tag is associated with an explicit action and when it is associated with an implicit action, it is not trivial to say whether an XML tag is case-sensitive or insensitive with respect to the first letter. If you are unsure which case to use for a given tag name, just follow the camelCase convention which is almost always the correct convention.
Logback从0.9.17 版本开始,与显式规则相关的标签名就不区分大小写。
例如, <logger>, <Logger> 和 <LOGGER> 都是有效的配置元素,并且将以相同的方式进行解析。
请注意,依然要遵守XML格式的语法规范,如果以<xyz>开始,则必须同样以</xyz>关闭, 而大小写不一致的 </XyZ> 等格式无效。
至于隐式规则,标签名除首字母外均区分大小写。
因此,<xyz> 和 <Xyz> 是等效的,但 <xYz> 则不是。
隐式规则通常遵循Java中常见的 [驼峰标识(camelCase)](https://zh.wikipedia.org/zh-cn/%E9%A9%BC%E5%B3%B0%E5%BC%8F%E5%A4%A7%E5%B0%8F%E5%86%99)。
由于很难区分某个标签何时与显式动作关联,何时与隐式动作关联,因此很难说XML标签是区分大小写呢,还是说首字母不区分大小写。
如果不确定给定标签适用哪种情况,只需遵循camelCase约定即可。
<logger> elementAt this point you should have at least some understanding of level inheritance and the basic selection rule. Otherwise, and unless you are an Egyptologist, logback configuration will be no more meaningful to you than are hieroglyphics.
A logger is configured using the element. A element takes exactly one mandatory name attribute, an optional level attribute, and an optional additivity attribute, admitting the values true or false. The value of the level attribute admitting one of the case-insensitive string values TRACE, DEBUG, INFO, WARN, ERROR, ALL or OFF. The special case-insensitive value INHERITED, or its synonym NULL, will force the level of the logger to be inherited from higher up in the hierarchy. This comes in handy if you set the level of a logger and later decide that it should inherit its level.
Note that unlike log4j, logback-classic does not close nor remove any previously referenced appenders when configuring a given logger.
The element may contain zero or more elements; each appender thus referenced is added to the named logger. Note that unlike log4j, logback-classic does not close nor remove any previously referenced appenders when configuring a given logger.
elementThe element configures the root logger. It supports a single attribute, namely the level attribute. It does not allow any other attributes because the additivity flag does not apply to the root logger. Moreover, since the root logger is already named as "ROOT", it does not allow a name attribute either. The value of the level attribute can be one of the case-insensitive strings TRACE, DEBUG, INFO, WARN, ERROR, ALL or OFF. Note that the level of the root logger cannot be set to INHERITED or NULL.
Note that unlike log4j, logback-classic does not close nor remove any previously referenced appenders when configuring the root logger.
Similarly to the element, the element may contain zero or more elements; each appender thus referenced is added to the root logger. Note that unlike log4j, logback-classic does not close nor remove any previously referenced appenders when configuring the root logger.
Setting the level of a logger or root logger is as simple as declaring it and setting its level, as the next example illustrates. Suppose we are no longer interested in seeing any DEBUG messages from any component belonging to the "chapters.configuration" package. The following configuration file shows how to achieve that.
Example: Setting the level of a logger (logback-examples/src/main/resources/chapters/configuration/sample2.xml)
<configuration>

  <appender name="STDOUT" class="ch.qos.logback.core.ConsoleAppender">
    <!-- encoders are assigned the type
         ch.qos.logback.classic.encoder.PatternLayoutEncoder by default -->
    <encoder>
      <pattern>%d{HH:mm:ss.SSS} [%thread] %-5level %logger{36} - %msg%n</pattern>
    </encoder>
  </appender>

  <logger name="chapters.configuration" level="INFO"/>

  <!-- Strictly speaking, the level attribute is not necessary since -->
  <!-- the level of the root level is set to DEBUG by default.       -->
  <root level="DEBUG">
    <appender-ref ref="STDOUT" />
  </root>

</configuration>
When the above configuration file is given as argument to the MyApp3 application, it will yield the following output:
17:34:07.578 [main] INFO  chapters.configuration.MyApp3 - Entering application.
17:34:07.578 [main] INFO  chapters.configuration.MyApp3 - Exiting application.
Note that the message of level DEBUG generated by the "chapters.configuration.Foo" logger has been suppressed. See also the Foo class.
You can configure the levels of as many loggers as you wish. In the next configuration file, we set the level of the chapters.configuration logger to INFO but at the same time set the level of the chapters.configuration.Foo logger to DEBUG.
Example: Setting the level of multiple loggers (logback-examples/src/main/resources/chapters/configuration/sample3.xml)
<configuration>

  <appender name="STDOUT"
    class="ch.qos.logback.core.ConsoleAppender">
    <encoder>
      <pattern>
        %d{HH:mm:ss.SSS} [%thread] %-5level %logger{36} - %msg%n
     </pattern>
    </encoder>
  </appender>

  <logger name="chapters.configuration" level="INFO" />
  <logger name="chapters.configuration.Foo" level="DEBUG" />

  <root level="DEBUG">
    <appender-ref ref="STDOUT" />
  </root>

</configuration>
Running MyApp3 with this configuration file will result in the following output on the console:
17:39:27.593 [main] INFO chapters.configuration.MyApp3 - Entering application. 17:39:27.593 [main] DEBUG chapters.configuration.Foo - Did it again! 17:39:27.593 [main] INFO chapters.configuration.MyApp3 - Exiting application.
The table below list the loggers and their levels, after JoranConfigurator has configured logback with the sample3.xml configuration file.
| Logger name | Assigned Level | Effective Level |
|---|---|---|
| root | DEBUG |
DEBUG |
| chapters.configuration | INFO |
INFO |
| chapters.configuration.MyApp3 | null |
INFO |
| chapters.configuration.Foo | DEBUG |
DEBUG |
It follows that the two logging statements of level INFO in the MyApp3 class as well as the DEBUG messages in Foo.doIt() are all enabled. Note that the level of the root logger is always set to a non-null value, DEBUG by default.
Let us note that the basic-selection rule depends on the effective level of the logger being invoked, not the level of the logger where appenders are attached. Logback will first determine whether a logging statement is enabled or not, and if enabled, it will invoke the appenders found in the logger hierarchy, regardless of their level. The configuration file sample4.xml is a case in point:
Example: Logger level sample (logback-examples/src/main/resources/chapters/configuration/sample4.xml)
<configuration>

  <appender name="STDOUT"
   class="ch.qos.logback.core.ConsoleAppender">
   <encoder>
     <pattern>
        %d{HH:mm:ss.SSS} [%thread] %-5level %logger{36} - %msg%n
      </pattern>
    </encoder>
  </appender>

  <logger name="chapters.configuration" level="INFO" />

  <!-- turn OFF all logging (children can override) -->
  <root level="OFF">
    <appender-ref ref="STDOUT" />
  </root>

</configuration>
The following table lists the loggers and their levels after applying the sample4.xml configuration file.
| Logger name | Assigned Level | Effective Level |
|---|---|---|
| root | OFF |
OFF |
| chapters.configuration | INFO |
INFO |
| chapters.configuration.MyApp3 | null |
INFO |
| chapters.configuration.Foo | null |
INFO |
The ConsoleAppender named STDOUT, the only configured appender in sample4.xml, is attached to the root logger whose level is set to OFF. However, running MyApp3 with configuration script sample4.xml will yield:
17:52:23.609 [main] INFO chapters.configuration.MyApp3 - Entering application.
17:52:23.609 [main] INFO chapters.configuration.MyApp3 - Exiting application.
Thus, the level of the root logger has no apparent effect because the loggers in chapters.configuration.MyApp3 and chapters.configuration.Foo classes are all enabled for the INFO level. As a side note, the chapters.configuration logger exists by virtue of its declaration in the configuration file - even if the Java source code does not directly refer to it.
An appender is configured with the element, which takes two mandatory attributes name and class. The name attribute specifies the name of the appender whereas the class attribute specifies the fully qualified name of the appender class to instantiate. The element may contain zero or one elements, zero or more elements and zero or more elements. Apart from these three common elements, elements may contain any number of elements corresponding to JavaBean properties of the appender class. Seamlessly supporting any property of a given logback component is one of the major strengths of Joran as discussed in a later chapter. The following diagram illustrates the common structure. Note that support for properties is not visible.
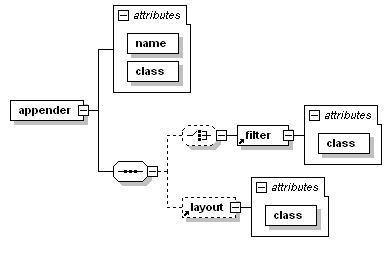
The element takes a mandatory class attribute specifying the fully qualified name of the layout class to instantiate. As with the element, may contain other elements corresponding to properties of the layout instance. Since it's such a common case, if the layout class is PatternLayout, then the class attribute can be omitted as specified by default class mapping rules.
The element takes a mandatory class attribute specifying the fully qualified name of the encoder class to instantiate. Since it's such a common case, if the encoder class is PatternLayoutEncoder, then the class attribute can be omitted as specified by default class mapping rules.
Logging to multiple appenders is as easy as defining the various appenders and referencing them in a logger, as the next configuration file illustrates:
Example: Multiple loggers (logback-examples/src/main/resources/chapters/configuration/multiple.xml)
<configuration>

  <appender name="FILE" class="ch.qos.logback.core.FileAppender">
    <file>myApp.log</file>

    <encoder>
      <pattern>%date %level [%thread] %logger{10} [%file:%line] %msg%n</pattern>
    </encoder>
  </appender>

  <appender name="STDOUT" class="ch.qos.logback.core.ConsoleAppender">
    <encoder>
      <pattern>%msg%n</pattern>
    </encoder>
  </appender>

  <root level="debug">
    <appender-ref ref="FILE" />
    <appender-ref ref="STDOUT" />
  </root>
</configuration>
These configuration scripts define two appenders called FILE and STDOUT. The FILE appender logs to a file called myApp.log. The encoder for this appender is a PatternLayoutEncoder that outputs the date, level, thread name, logger name, file name and line number where the log request is located, the message and line separator character(s). The second appender called STDOUT outputs to the console. The encoder for this appender outputs only the message string followed by a line separator.
The appenders are attached to the root logger by referencing them by name within an appender-ref element. Note that each appender has its own encoder. Encoders are usually not designed to be shared by multiple appenders. The same is true for layouts. As such, logback configuration files do not provide any syntactical means for sharing encoders or layouts.
By default, appenders are cumulative: a logger will log to the appenders attached to itself (if any) as well as all the appenders attached to its ancestors. Thus, attaching the same appender to multiple loggers will cause logging output to be duplicated.
Example: Duplicate appender (logback-examples/src/main/resources/chapters/configuration/duplicate.xml)
<configuration>

  <appender name="STDOUT" class="ch.qos.logback.core.ConsoleAppender">
    <encoder>
      <pattern>%d{HH:mm:ss.SSS} [%thread] %-5level %logger{36} - %msg%n</pattern>
    </encoder>
  </appender>

  <logger name="chapters.configuration">
    <appender-ref ref="STDOUT" />
  </logger>

  <root level="debug">
    <appender-ref ref="STDOUT" />
  </root>
</configuration>
Running MyApp3 with duplicate.xml will yield the following output:
14:25:36.343 [main] INFO chapters.configuration.MyApp3 - Entering application. 14:25:36.343 [main] INFO chapters.configuration.MyApp3 - Entering application. 14:25:36.359 [main] DEBUG chapters.configuration.Foo - Did it again! 14:25:36.359 [main] DEBUG chapters.configuration.Foo - Did it again! 14:25:36.359 [main] INFO chapters.configuration.MyApp3 - Exiting application. 14:25:36.359 [main] INFO chapters.configuration.MyApp3 - Exiting application.
Notice the duplicated output. The appender named STDOUT is attached to two loggers, to root and to chapters.configuration. Since the root logger is the ancestor of all loggers and chapters.configuration is the parent of both chapters.configuration.MyApp3 and chapters.configuration.Foo, each logging request made with these two loggers will be output twice, once because STDOUT is attached to chapters.configuration and once because it is attached to root.
Appender additivity is not intended as a trap for new users. It is quite a convenient logback feature. For instance, you can configure logging such that log messages appear on the console (for all loggers in the system) while messages only from some specific set of loggers flow into a specific appender.
Example: Multiple appender (logback-examples/src/main/resources/chapters/configuration/restricted.xml)
<configuration>

  <appender name="FILE" class="ch.qos.logback.core.FileAppender">
    <file>myApp.log</file>
    <encoder>
      <pattern>%date %level [%thread] %logger{10} [%file:%line] %msg%n</pattern>
    </encoder>
  </appender>

  <appender name="STDOUT" class="ch.qos.logback.core.ConsoleAppender">
    <encoder>
      <pattern>%msg%n</pattern>
    </encoder>
  </appender>

  <logger name="chapters.configuration">
    <appender-ref ref="FILE" />
  </logger>

  <root level="debug">
    <appender-ref ref="STDOUT" />
  </root>
</configuration>
In this example, the console appender will log all the messages (for all loggers in the system) whereas only logging requests originating from the chapters.configuration logger and its children will go into the myApp.log file.
In case the default cumulative behavior turns out to be unsuitable for your needs, you can override it by setting the additivity flag to false. Thus, a branch in your logger tree may direct output to a set of appenders different from those of the rest of the tree.
Example: Additivity flag (logback-examples/src/main/resources/chapters/configuration/additivityFlag.xml)
<configuration>

  <appender name="FILE" class="ch.qos.logback.core.FileAppender">
    <file>foo.log</file>
    <encoder>
      <pattern>%date %level [%thread] %logger{10} [%file : %line] %msg%n</pattern>
    </encoder>
  </appender>

  <appender name="STDOUT" class="ch.qos.logback.core.ConsoleAppender">
    <encoder>
      <pattern>%msg%n</pattern>
    </encoder>
  </appender>

  <logger name="chapters.configuration.Foo" additivity="false">
    <appender-ref ref="FILE" />
  </logger>

  <root level="debug">
    <appender-ref ref="STDOUT" />
  </root>
</configuration>
This example, the appender named FILE is attached to the chapters.configuration.Foo logger. Moreover, the chapters.configuration.Foo logger has its additivity flag set to false such that its logging output will be sent to the appender named FILE but not to any appender attached higher in the hierarchy. Other loggers remain oblivious to the additivity setting of the chapters.configuration.Foo logger. Running the MyApp3 application with the additivityFlag.xml configuration file will output results on the console from the chapters.configuration.MyApp3 logger. However, output from the chapters.configuration.Foo logger will appear in the foo.log file and only in that file.
As mentioned in an earlier chapter, every logger is attached to a logger context. By default, the logger context is called "default". However, you can set a different name with the help of the configuration directive. Note that once set, the logger context name cannot be changed. Setting the context name is a simple and straightforward method in order to distinguish between multiple applications logging to the same target.
Example: Set the context name and display it (logback-examples/src/main/resources/chapters/configuration/contextName.xml)
<configuration>
  <contextName>myAppName</contextName>
  <appender name="STDOUT" class="ch.qos.logback.core.ConsoleAppender">
    <encoder>
      <pattern>%d %contextName [%t] %level %logger{36} - %msg%n</pattern>
    </encoder>
  </appender>

  <root level="debug">
    <appender-ref ref="STDOUT" />
  </root>
</configuration>
This last example illustrates naming of the logger context. Adding the contextName conversion word in layout's pattern will output the said name.
NOTE Earlier versions of this document used the term "property substitution" instead of the term "variable". Please consider both terms interchangeable although the latter term conveys a clearer meaning.
As in many scripting languages, logback configuration files support definition and substitution of variables. Variables have a scope (see below). Moreover, variables can be defined within the configuration file itself, in an external file, in an external resource or even computed and defined on the fly.
Variable substitution can occur at any point in a configuration file where a value can be specified.
Variable substitution can occur at any point in a configuration file where a value can be specified. The syntax of variable substitution is similar to that of Unix shells. The string between an opening ${ and closing } is interpreted as a reference to the value of the property. For property aName, the string "${aName}" will be replaced with the value held by the aName property.
As they often come in handy, the HOSTNAME and CONTEXT_NAME variables are automatically defined and have context scope. Given that in some environments it may take some time to compute the hostname, its value is computed lazily (only when needed). Moreover, HOSTNAME can be set from within the configuration directly.
Variables can be defined one at a time in the configuration file itself or loaded wholesale from an external properties file or an external resource. For historical reasons, the XML element for defining variables is although in logback 1.0.7 and later the element can be used interchangeably.
The next example shows a variable declared at the beginning of the configuration file. It is then used further down the file to specify the location of the output file.
Example: Simple Variable substitution (logback-examples/src/main/resources/chapters/configuration/variableSubstitution1.xml)
<configuration>

  <property name="USER_HOME" value="/home/sebastien" />

  <appender name="FILE" class="ch.qos.logback.core.FileAppender">
    <file>${USER_HOME}/myApp.log</file>
    <encoder>
      <pattern>%msg%n</pattern>
    </encoder>
  </appender>

  <root level="debug">
    <appender-ref ref="FILE" />
  </root>
</configuration>
The next example shows the use of a System property to achieve the same result. The property is not declared in the configuration file, thus logback will look for it in the System properties. Java system properties can be set on the command line as shown next:
java -DUSER_HOME="/home/sebastien" MyApp2
Example: System Variable substitution (logback-examples/src/main/resources/chapters/configuration/variableSubstitution2.xml)
<configuration>

  <appender name="FILE" class="ch.qos.logback.core.FileAppender">
    <file>${USER_HOME}/myApp.log</file>
    <encoder>
      <pattern>%msg%n</pattern>
    </encoder>
  </appender>

  <root level="debug">
    <appender-ref ref="FILE" />
  </root>
</configuration>
When multiple variables are needed, it may be more convenient to create a separate file that will contain all the variables. Here is how one can do such a setup.
Example: Variable substitution using a separate file (logback-examples/src/main/resources/chapters/configuration/variableSubstitution3.xml)
<configuration>

  <property file="src/main/java/chapters/configuration/variables1.properties" />

  <appender name="FILE" class="ch.qos.logback.core.FileAppender">
     <file>${USER_HOME}/myApp.log</file>
     <encoder>
       <pattern>%msg%n</pattern>
     </encoder>
   </appender>

   <root level="debug">
     <appender-ref ref="FILE" />
   </root>
</configuration>
This configuration file contains a reference to a file named variables1.properties. The variables contained in that file will be read and then defined within local scope. Here is what the variable.properties file might look like.
Example: Variable file (logback-examples/src/main/resources/chapters/configuration/variables1.properties)
You may also reference a resource on the class path instead of a file.
<configuration>

  <property resource="resource1.properties" />

  <appender name="FILE" class="ch.qos.logback.core.FileAppender">
     <file>${USER_HOME}/myApp.log</file>
     <encoder>
       <pattern>%msg%n</pattern>
     </encoder>
   </appender>

   <root level="debug">
     <appender-ref ref="FILE" />
   </root>
</configuration>
A property can be defined for insertion in local scope, in context scope, or in system scope. Local scope is the default. Although it is possible to read variables from the OS environment, it is not possible to write into the OS environment.
LOCAL SCOPE A property with local scope exists from the point of its definition in a configuration file until the end of interpretation/execution of said configuration file. As a corollary, each time a configuration file is parsed and executed, variables in local scope are defined anew.
CONTEXT SCOPE A property with context scope is inserted into the context and lasts as long as the context or until it is cleared. Once defined, a property in context scope is part of the context. As such, it is available in all logging events, including those sent to remote hosts via serialization.
SYSTEM SCOPE A property with system scope is inserted into the JVM's system properties and lasts as long as the JVM or until it is cleared.
Properties are looked up in the the local scope first, in the context scope second, in the system properties scope third, and in the OS environment last.
During substitution, properties are looked up in the local scope first, in the context scope second, in the system properties scope third, and in the OS environment fourth and last.
The scope attribute of the element, element or the element can be used to set the scope of a property. The scope attribute admits "local", "context" and "system" strings as possible values. If not specified, the scope is always assumed to be "local".
Example: A variable defined in "context" scope (logback-examples/src/main/resources/chapters/configuration/contextScopedVariable.xml)
<configuration>

  <property scope="context" name="nodeId" value="firstNode" />

  <appender name="FILE" class="ch.qos.logback.core.FileAppender">
    <file>/opt/${nodeId}/myApp.log</file>
    <encoder>
      <pattern>%msg%n</pattern>
    </encoder>
  </appender>

  <root level="debug">
    <appender-ref ref="FILE" />
  </root>
</configuration>
In the above example, given that the nodeId property is defined in the context scope, it will be available in every logging event, even those sent to remote hosts via serialization.
Under certain circumstances, it may be desirable for a variable to have a default value if it is not declared or its value is null. As in the Bash shell, default values can be specified using the ":-" operator. For example, assuming the variable named aName is not defined, "${aName:-golden}" will be interpreted as "golden".
Variable nesting is fully supported. Both the name, default-value and value definition of a variable can reference other variables.
The value definition of a variable can contain references to other variables. Suppose you wish to use variables to specify not only the destination directory but also the file name, and combine those two variables in a third variable called "destination". The properties file shown below gives an example.
Example: Nested variable references (logback-examples/src/main/resources/chapters/configuration/variables2.properties)
USER_HOME=/home/sebastien
fileName=myApp.log
destination=${USER_HOME}/${fileName}
Note that in the properties file above, "destination" is composed from two other variables, namely "USER_HOME" and "fileName".
Example: Variable substitution using a separate file (logback-examples/src/main/resources/chapters/configuration/variableSubstitution4.xml)
When referencing a variable, the variable name may contain a reference to another variable. For example, if the variable named "userid" is assigned the value "alice", then "${${userid}.password}" references the variable with the name "alice.password".
The default value of a variable can reference a another variable. For example, assuming the variable 'id' is unassigned and the variable 'userid' is assigned the value "alice", then the expression "${id:-${userid}}" will return "alice".
As it often comes in handy, the HOSTNAME property is defined automatically during configuration with context scope.
As its name indicates, the CONTEXT_NAME property corresponds to the name of the current logging context.
The timestamp element can define a property according to current date and time. The timestamp element is explained in a subsequent chapter.
You may define properties dynamically using the element. The define element takes two mandatory attributes: name and class. The name attribute designates the name of the property to set whereas the class attribute designates any class implementing the PropertyDefiner interface. The value returned by the getPropertyValue() method of the PropertyDefiner instance will be the value of the named property. You may also specify a scope for the named property by specifying a scope attribute.
Here is an example.
<configuration>

  <define name="rootLevel" class="a.class.implementing.PropertyDefiner">
    <shape>round</shape>
    <color>brown</color>
    <size>24</size>
  </define>

  <root level="${rootLevel}"/>
</configuration>
In the above example, shape, color and size are properties of "a.class.implementing.PropertyDefiner". As long as there is a setter for a given property in your implementation of the PropertyDefiner instance, logback will inject the appropriate values as specified in the configuration file.
At the present time, logback does ships with two fairly simple implementations of PropertyDefiner.
| Implementation name | Description |
|---|---|
CanonicalHostNamePropertyDefiner |
Set the named variable to the canonical host name of the local host. Note that obtaining the canonical host name may take several seconds. |
FileExistsPropertyDefiner |
Set the named variable to "true" if the file specified by path property exists, to "false" otherwise. |
ResourceExistsPropertyDefiner |
Set the named variable to "true" if the resource specified by the user is available on the class path, to "false" otherwise. |
Developers often need to juggle between several logback configuration files targeting different environments such as development, testing and production. These configuration files have substantial parts in common differing only in a few places. To avoid duplication, logback supports conditional processing of configuration files with the help of -, - and - elements so that a single configuration file can adequately target several environments. Note that conditional processing requires the Janino library.
The general format for conditional statements is shown below.
   <!-- if-then form -->
   <if condition="some conditional expression">
    <then>
      ...
    </then>
  </if>

  <!-- if-then-else form -->
  <if condition="some conditional expression">
    <then>
      ...
    </then>
    <else>
      ...
    </else>
  </if>
The condition is a Java expression in which only context properties or system properties are accessible. For a key passed as argument, the property() or its shorter equivalent p() methods return the String value of the property. For example, to access the value of a property with key "k", you would write property("k") or equivalently p("k"). If the property with key "k" is undefined, the property method will return the empty string and not null. This avoids the need to check for null values.
The isDefined() method can be used to check whether a property is defined. For example, to check whether the property "k" is defined you would write isDefined("k") Similarly, if you need to check whether a property is null, the isNull() method is provided. Example: isNull("k").
<configuration debug="true">

  <if condition='property("HOSTNAME").contains("torino")'>
    <then>
      <appender name="CON" class="ch.qos.logback.core.ConsoleAppender">
        <encoder>
          <pattern>%d %-5level %logger{35} - %msg %n</pattern>
        </encoder>
      </appender>
      <root>
        <appender-ref ref="CON" />
      </root>
    </then>
  </if>

  <appender name="FILE" class="ch.qos.logback.core.FileAppender">
    <file>${randomOutputDir}/conditional.log</file>
    <encoder>
      <pattern>%d %-5level %logger{35} - %msg %n</pattern>
   </encoder>
  </appender>

  <root level="ERROR">
     <appender-ref ref="FILE" />
  </root>
</configuration>
Conditional processing is supported anywhere within the element. Nested if-then-else statements are also supported. However, XML syntax is awfully cumbersome and is ill suited as the foundation of a general purpose programming language. Consequently, too many conditionals will quickly render your configuration files incomprehensible to subsequent readers, including yourself.
Under certain circumstances, you may want to make use of env-entries stored in JNDI. The configuration directive extracts an env-entry stored in JNDI and inserts the property in local scope with key specified by the as attribute. As all properties, it is possible to insert the new property into a different scope with the help of the scope attribute.
Example: Insert as properties env-entries obtained via JNDI (logback-examples/src/main/resources/chapters/configuration/insertFromJNDI.xml)
<configuration>
  <insertFromJNDI env-entry-name="java:comp/env/appName" as="appName" />
  <contextName>${appName}</contextName>

  <appender name="CONSOLE" class="ch.qos.logback.core.ConsoleAppender">
    <encoder>
      <pattern>%d ${CONTEXT_NAME} %level %msg %logger{50}%n</pattern>
    </encoder>
  </appender>

  <root level="DEBUG">
    <appender-ref ref="CONSOLE" />
  </root>
</configuration>
In this last example, the "java:comp/env/appName" env-entry is inserted as the appName property. Note that the directive sets the context name based on the value of the appName property inserted by the previous directive.
Joran supports including parts of a configuration file from another file. This is done by declaring a element, as shown below:
Example: File include (logback-examples/src/main/resources/chapters/configuration/containingConfig.xml)
<configuration>
  <include file="src/main/java/chapters/configuration/includedConfig.xml"/>

  <root level="DEBUG">
    <appender-ref ref="includedConsole" />
  </root>

</configuration>
The target file MUST have its elements nested inside an element. For example, a ConsoleAppender could be declared as:
Example: File include (logback-examples/src/main/resources/chapters/configuration/includedConfig.xml)
<included>
  <appender name="includedConsole" class="ch.qos.logback.core.ConsoleAppender">
    <encoder>
      <pattern>"%d - %m%n"</pattern>
    </encoder>
  </appender>
</included>
Again, please note the mandatory element.
The contents to include can be referenced as a file, as a resource, or as a URL.
As a file:
To include a file use the file attribute. You can use relative paths but note that the current directory is defined by the application and is not necessarily related to the path of the configuration file.
As a resource:
To include a resource, i.e a file found on the class path, use the resource attribute.
<include resource="includedConfig.xml"/>
As a URL:
To include the contents of a URL use the url attribute.
<include url="http://some.host.com/includedConfig.xml"/>
If it cannot find the file to be included, logback will complain by printing a status message. In case the included file is optional, you can suppress the warning message by setting optional attribute to true in the element.
<include optional="true" ..../>
Instances of the LoggerContextListener interface listen to events pertaining to the lifecycle of a logger context.
JMXConfigurator is one implementation of the LoggerContextListener interface. It is described in a subsequent chapter.
As of version 0.9.25, logback-classic ships with LevelChangePropagator, an implementation of LoggerContextListener which propagates changes made to the level of any logback-classic logger onto the java.util.logging framework. Such propagation eliminates the performance impact of disabled log statements. Instances of LogRecord will be sent to logback (via SLF4J) only for enabled log statements. This makes it reasonable for real-world applications to use the jul-to-slf4j bridge.
The contextListener element can be used to install LevelChangePropagator as shown next.
<configuration debug="true">
  <contextListener class="ch.qos.logback.classic.jul.LevelChangePropagator"/>
  ....
</configuration>
Setting the resetJUL property of LevelChangePropagator will reset all previous level configurations of all j.u.l. loggers. However, previously installed handlers will be left untouched.
<configuration debug="true">
  <contextListener class="ch.qos.logback.classic.jul.LevelChangePropagator">
    <resetJUL>true</resetJUL>
  </contextListener>
  ....
</configuration>
此处可能存在不合适展示的内容,页面不予展示。您可通过相关编辑功能自查并修改。
如您确认内容无涉及 不当用语 / 纯广告导流 / 暴力 / 低俗色情 / 侵权 / 盗版 / 虚假 / 无价值内容或违法国家有关法律法规的内容,可点击提交进行申诉,我们将尽快为您处理。


