代码拉取完成,页面将自动刷新
同步操作将从 萌萌哒赫萝/PicList 强制同步,此操作会覆盖自 Fork 仓库以来所做的任何修改,且无法恢复!!!
确定后同步将在后台操作,完成时将刷新页面,请耐心等待。

简体中文 | English
PicList is an efficient cloud storage and image hosting platform management tool. Building upon the foundation of PicGo, it has been deeply modified and enhanced. Not only does it retain all of PicGo's features, but it also adds many new ones. For instance, the album now supports synchronized deletion of files in the cloud. Built-in image hosting options have been expanded to include WebDav, local image hosting, and SFTP. Additionally, PicList introduces comprehensive cloud storage management functions, including cloud directory viewing, file search, batch uploading, downloading, and file deletion, copying links in various formats, and previews for images, markdown, text, and videos. Moreover, it boasts a more powerful album function and numerous other improvements and enhancements.
PicList V1.5.0 and above versions provide the one-click migration function. Enter the Settings page, and then click the right button on the Migrate from PicGo option to migrate. Please restart the application to take effect after migration.
The core of PicList is based on the original PicGo-Core PicList-core, which is adapted for cloud deletion and other functions, and adds watermark addition and image compression / scaling / rotation / format conversion functions, which can be called through CLI command line, support starting the built-in upload server through picgo-server,as well as some other function changes.
if you want to use PicList-core, please go to https://github.com/Kuingsmile/PicList-Core, or go to npm official address to view the installation instructions.
Please install my matching plugin VS-PicList, compared with the vs-picgo plugin, the plugin directly depends on the PicList desktop software, supports a variety of uploads and direct cloud deletion in Vscode and other functions.
Typora 1.6.0-dev and above versions now support PicList natively
Now you need to set the upload service PicList and PicGo (app) to the installation path of PicList at the same time, it has been fixed in latest dev version.
Windows:
Enter the Typora settings page, select the image, set the upload service to PicGo(app), and then fill in the installation path of PicList in PicGo path, as shown below:
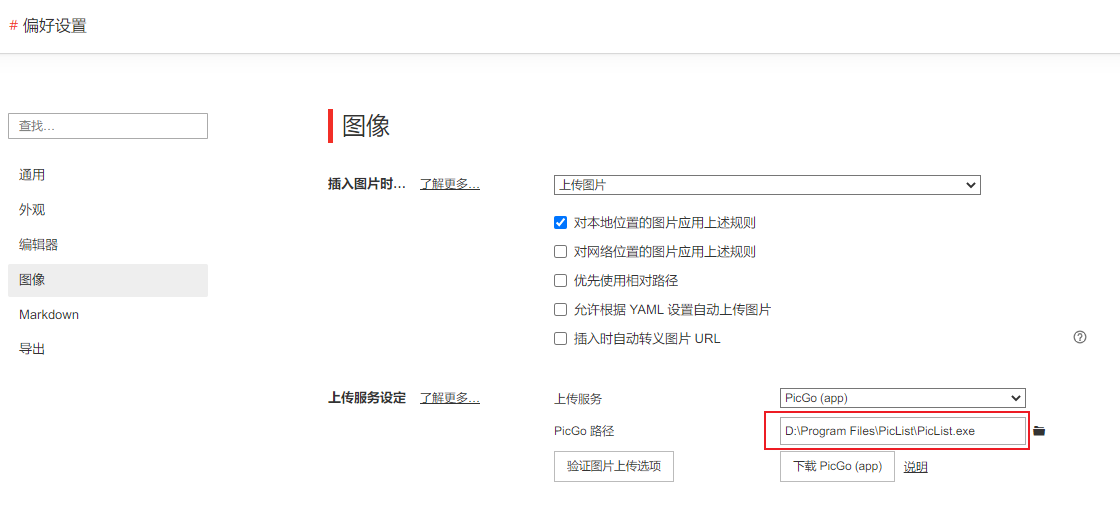
Or, you can also use the npm install piclist command to install PicList-core, and then set the upload service to PicGo-Core(command line).
MacOS:
Enter the Typora settings page, select the image, set the upload service to Custom Command, and then fill in /Applications/PicList.app/Contents/MacOS/PicList upload in Command, as shown below:
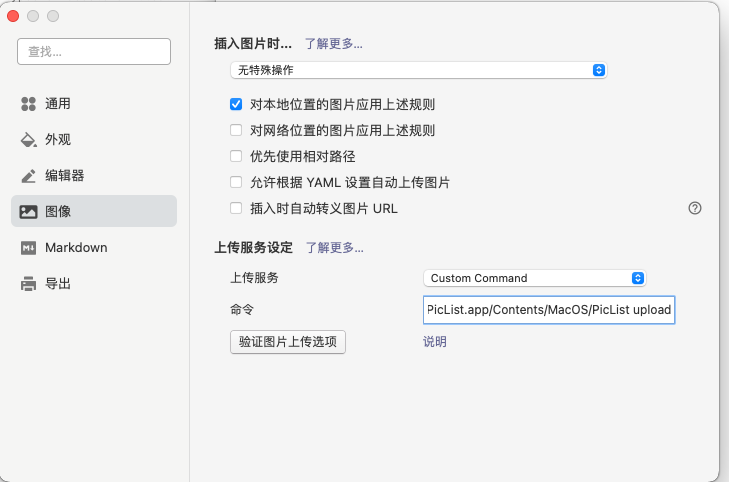
The verification of the upload option may have problems, you can ignore it, and use it directly.
In the community plugins, search for and install the Image auto upload Plugin. Next, go to the plugin settings page and change the default uploader to PicGo(app). Set the PicGo server to http://127.0.0.1:36677/upload as shown in the image below. Additionally, this plugin also supports cloud-based deletion through PicList. To use this feature, enter http://127.0.0.1:36677/delete in the deletion interface.

Change the ./piclist to your own path, this is the path where you put your config.json file, and change the piclist123456 to your own secret key.
docker run -d \
  --name piclist \
  --restart always \
  -p 36677:36677 \
  -v "./piclist:/root/.piclist" \
  kuingsmile/piclist:latest \
  node /usr/local/bin/picgo-server -k piclist123456
download docker-compose.yml from piclist-core repo, or copy the following content to docker-compose.yml:
version: '3.3'

services:
  node:
    image: 'kuingsmile/piclist:latest'
    container_name: piclist
    restart: always
    ports:
      - 36677:36677
    volumes:
      - './piclist:/root/.piclist'
    command: node /usr/local/bin/picgo-server -k piclist123456
You can change the ./piclist to your own path, this is the path where you put your config.json file, and change the command to your own secret key.
Then run:
docker-compose up -d
| Platform | Album cloud deletion | Cloud storage management |
|---|---|---|
| SM.MS | ✔️ | ✔️ |
| Github | ✔️ | ✔️ |
| Imgur | ✔️ | ✔️ |
| Tencent COS V5 | ✔️ | ✔️ |
| Aliyun OSS | ✔️ | ✔️ |
| Upyun | ✔️ | ✔️ |
| Qiniu | ✔️ | ✔️ |
| S3 API compatible platform | ✔️ | ✔️ |
| WebDAV | ✔️ | ✔️ |
| Local | ✔️ | ✔️ |
| Built-in SFTP | ✔️ | ✔️ |
| Doge Cloud | ✔️ | ✔️ |
| PicList(Lasso-Doll) | ✔️ | ✔️ |
| Telegra.ph | ✔️ | × |
| Lsky Pro | ✔️ | ✔️ |
| Plugin | Album cloud deletion |
|---|---|
| picgo-plugin-s3 | ✔️ |
| picgo-plugin-alist | ✔️ |
| picgo-plugin-huawei-uploader | ✔️ |
| picgo-plugin-dogecloud | ✔️ |
https://github.com/Kuingsmile/PicList/releases/latest
MacOS users can now use Homebrew to install PicList, just execute the following command:
brew install piclist --cask
Uninstall:
brew uninstall piclist
If the macOS system installs PicList and displays "file is damaged" or installs and opens without response, please upgrade to PicList V1.4.1 or above.
After V1.4.1, all mac installation packages have been signed by my developer certificate, will not be recognized by the macOS system as "malicious software", will not appear "file is damaged" prompt.
Due to the sandbox mechanism of Mac App Store, many functions cannot be used normally, so the installation method of Mac App Store is no longer supported.
If you have purchased PicList through Mac App Store, please add my WeChat pku_sq_ma, I will refund you.
Thank you again for your support for PicList.
Of course, if you don't want to pay, you can also download the free installation package through Github to install.
yarn download dependencies
Note that if you don't have yarn, please go to the official website to download and install it before using it. Using npm install will cause unknown errors!Xcode environment, Windows needs VS environment.Enter yarn run dev to enter development mode, which has hot reload feature. However, it should be noted that the development mode is unstable and there will be process crashes. At this time, you need to:
ctrl+c # Exit development mode
yarn run dev # Re-enter development mode
Note: After the development mode is running, the application icon of PicList will appear in the application area of the taskbar in the lower right corner of the bottom bar.
If you need to build it yourself, you can start building with yarn run build. After the build is successful, the corresponding installation file will appear in the dist_electron directory.
If you have any questions, you can join the TG group for communication.

This project is open source under the MIT license. Welcome everyone to use and contribute code. Thank you for the open source spirit of the original author Molunerfinn.
Copyright (c) 2017-present Molunerfinn
Copyright (c) 2023-present Kuingsmile


此处可能存在不合适展示的内容,页面不予展示。您可通过相关编辑功能自查并修改。
如您确认内容无涉及 不当用语 / 纯广告导流 / 暴力 / 低俗色情 / 侵权 / 盗版 / 虚假 / 无价值内容或违法国家有关法律法规的内容,可点击提交进行申诉,我们将尽快为您处理。