

代码拉取完成,页面将自动刷新
The requirements for storing model information during training are very different from when you want to release it as part of a mobile app. This section covers the tools involved in converting from a training model to something releasable in production.
You may find yourself getting very confused by all the different ways that TensorFlow can save out graphs. To help, here’s a rundown of some of the different components, and what they are used for. The objects are mostly defined and serialized as protocol buffers:
NodeDef:
Defines a single operation in a model. It has a unique name, a list of the
names of other nodes it pulls inputs from, the operation type it implements
(for example Add, or Mul), and any attributes that are needed to control
that operation. This is the basic unit of computation for TensorFlow, and all
work is done by iterating through a network of these nodes, applying each one
in turn. One particular operation type that’s worth knowing about is Const,
since this holds information about a constant. This may be a single, scalar
number or string, but it can also hold an entire multi-dimensional tensor
array. The values for a Const are stored inside the NodeDef, and so large
constants can take up a lot of room when serialized.
Checkpoint. Another
way of storing values for a model is by using Variable ops. Unlike Const
ops, these don’t store their content as part of the NodeDef, so they take up
very little space within the GraphDef file. Instead their values are held in
RAM while a computation is running, and then saved out to disk as checkpoint
files periodically. This typically happens as a neural network is being
trained and weights are updated, so it’s a time-critical operation, and it may
happen in a distributed fashion across many workers, so the file format has to
be both fast and flexible. They are stored as multiple checkpoint files,
together with metadata files that describe what’s contained within the
checkpoints. When you’re referring to a checkpoint in the API (for example
when passing a filename in as a command line argument), you’ll use the common
prefix for a set of related files. If you had these files:
  /tmp/model/model-chkpt-1000.data-00000-of-00002
  /tmp/model/model-chkpt-1000.data-00001-of-00002
  /tmp/model/model-chkpt-1000.index
  /tmp/model/model-chkpt-1000.meta
You would refer to them as /tmp/model/chkpt-1000.
GraphDef:
Has a list of NodeDefs, which together define the computational graph to
execute. During training, some of these nodes will be Variables, and so if
you want to have a complete graph you can run, including the weights, you’ll
need to call a restore operation to pull those values from
checkpoints. Because checkpoint loading has to be flexible to deal with all of
the training requirements, this can be tricky to implement on mobile and
embedded devices, especially those with no proper file system available like
iOS. This is where
the
freeze_graph.py script
comes in handy. As mentioned above, Const ops store their values as part of
the NodeDef, so if all the Variable weights are converted to Const nodes,
then we only need a single GraphDef file to hold the model architecture and
the weights. Freezing the graph handles the process of loading the
checkpoints, and then converts all Variables to Consts. You can then load the
resulting file in a single call, without having to restore variable values
from checkpoints. One thing to watch out for with GraphDef files is that
sometimes they’re stored in text format for easy inspection. These versions
usually have a ‘.pbtxt’ filename suffix, whereas the binary files end with
‘.pb’.
FunctionDefLibrary:
This appears in GraphDef, and is effectively a set of sub-graphs, each with
information about their input and output nodes. Each sub-graph can then be
used as an op in the main graph, allowing easy instantiation of different
nodes, in a similar way to how functions encapsulate code in other languages.
MetaGraphDef:
A plain GraphDef only has information about the network of computations, but
doesn’t have any extra information about the model or how it can be
used. MetaGraphDef contains a GraphDef defining the computation part of
the model, but also includes information like ‘signatures’, which are
suggestions about which inputs and outputs you may want to call the model
with, data on how and where any checkpoint files are saved, and convenience
tags for grouping ops together for ease of use.
SavedModel:
It’s common to want to have different versions of a graph that rely on a
common set of variable checkpoints. For example, you might need a GPU and a
CPU version of the same graph, but keep the same weights for both. You might
also need some extra files (like label names) as part of your
model. The
SavedModel format
addresses these needs by letting you save multiple versions of the same graph
without duplicating variables, and also storing asset files in the same
bundle. Under the hood, it uses MetaGraphDef and checkpoint files, along
with extra metadata files. It’s the format that you’ll want to use if you’re
deploying a web API using TensorFlow Serving, for example.
In most situations, training a model with TensorFlow will give you a folder
containing a GraphDef file (usually ending with the .pb or .pbtxt extension) and
a set of checkpoint files. What you need for mobile or embedded deployment is a
single GraphDef file that’s been ‘frozen’, or had its variables converted into
inline constants so everything’s in one file. To handle the conversion, you’ll
need the freeze_graph.py script, that’s held in
tensorflow/python/tools/freeze_graph.py. You’ll run it like this:
bazel build tensorflow/python/tools:freeze_graph
bazel-bin/tensorflow/python/tools/freeze_graph \
--input_graph=/tmp/model/my_graph.pb \
--input_checkpoint=/tmp/model/model.ckpt-1000 \
--output_graph=/tmp/frozen_graph.pb \
--output_node_names=output_node \
The input_graph argument should point to the GraphDef file that holds your
model architecture. It’s possible that your GraphDef has been stored in a text
format on disk, in which case it’s likely to end in .pbtxt instead of .pb,
and you should add an extra --input_binary=false flag to the command.
The input_checkpoint should be the most recent saved checkpoint. As mentioned
in the checkpoint section, you need to give the common prefix to the set of
checkpoints here, rather than a full filename.
output_graph defines where the resulting frozen GraphDef will be
saved. Because it’s likely to contain a lot of weight values that take up a
large amount of space in text format, it’s always saved as a binary protobuf.
output_node_names is a list of the names of the nodes that you want to extract
the results of your graph from. This is needed because the freezing process
needs to understand which parts of the graph are actually needed, and which are
artifacts of the training process, like summarization ops. Only ops that
contribute to calculating the given output nodes will be kept. If you know how
your graph is going to be used, these should just be the names of the nodes you
pass into Session::Run() as your fetch targets. The easiest way to find the
node names is to inspect the Node objects while building your graph in python.
Inspecting your graph in TensorBoard is another simple way. You can get some
suggestions on likely outputs by running the summarize_graph tool.
Because the output format for TensorFlow has changed over time, there are a
variety of other less commonly used flags available too, like input_saver, but
hopefully you shouldn’t need these on graphs trained with modern versions of the
framework.
A lot of the things you need to do to efficiently run a model on device are
available through the Graph Transform
Tool. This
command-line tool takes an input GraphDef file, applies the set of rewriting
rules you request, and then writes out the result as a GraphDef. See the
documentation for more information on how to build and run this tool.
TensorFlow GraphDefs produced by the training code contain all of the
computation that’s needed for back-propagation and updates of weights, as well
as the queuing and decoding of inputs, and the saving out of checkpoints. All of
these nodes are no longer needed during inference, and some of the operations
like checkpoint saving aren’t even supported on mobile platforms. To create a
model file that you can load on devices you need to delete those unneeded
operations by running the strip_unused_nodes rule in the Graph Transform Tool.
The trickiest part of this process is figuring out the names of the nodes you want to use as inputs and outputs during inference. You'll need these anyway once you start to run inference, but you also need them here so that the transform can calculate which nodes are not needed on the inference-only path. These may not be obvious from the training code. The easiest way to determine the node name is to explore the graph with TensorBoard.
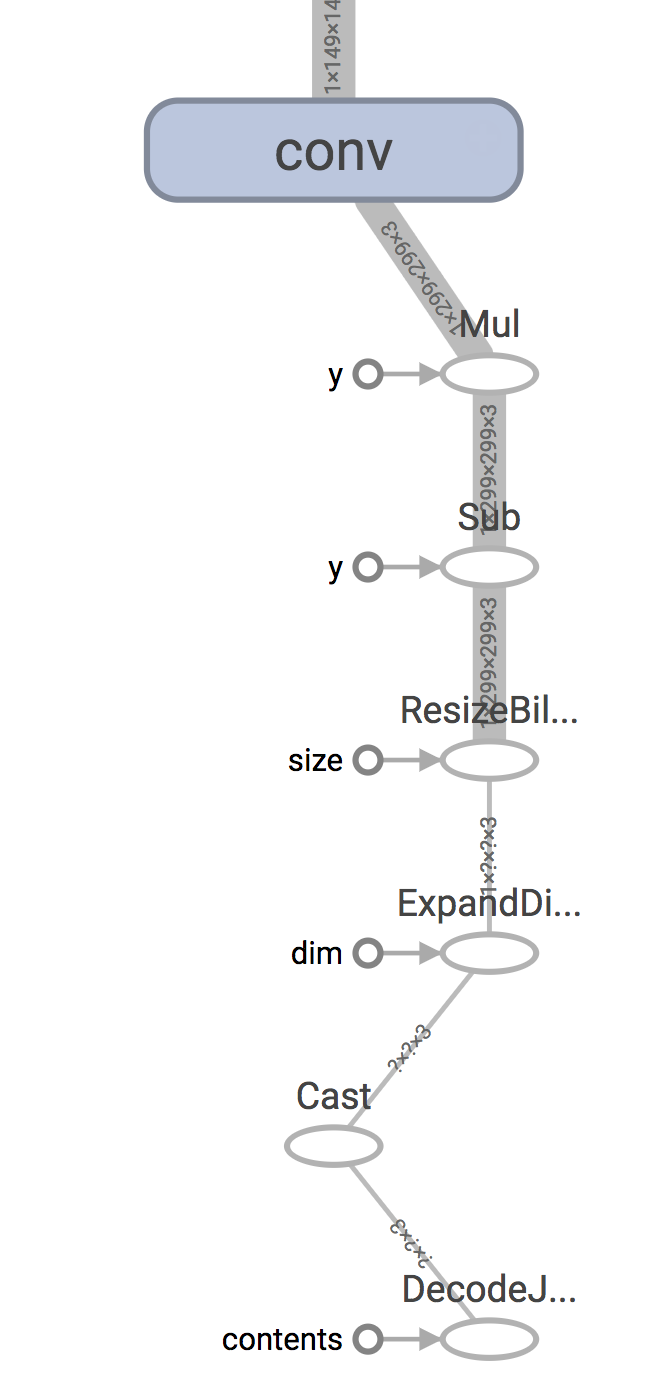
Remember that mobile applications typically gather their data from sensors and
have it as arrays in memory, whereas training typically involves loading and
decoding representations of the data stored on disk. In the case of Inception v3
for example, there’s a DecodeJpeg op at the start of the graph that’s designed
to take JPEG-encoded data from a file retrieved from disk and turn it into an
arbitrary-sized image. After that there’s a BilinearResize op to scale it to
the expected size, followed by a couple of other ops that convert the byte data
into float and scale the value magnitudes it in the way the rest of the graph
expects. A typical mobile app will skip most of these steps because it’s getting
its input directly from a live camera, so the input node you will actually
supply will be the output of the Mul node in this case.
You’ll need to do a similar process of inspection to figure out the correct output nodes.
If you’ve just been given a frozen GraphDef file, and are not sure about the
contents, try using the summarize_graph tool to print out information
about the inputs and outputs it finds from the graph structure. Here’s an
example with the original Inception v3 file:
bazel run tensorflow/tools/graph_transforms:summarize_graph --
--in_graph=tensorflow_inception_graph.pb
Once you have an idea of what the input and output nodes are, you can feed them
into the graph transform tool as the --input_names and --output_names
arguments, and call the strip_unused_nodes transform, like this:
bazel run tensorflow/tools/graph_transforms:transform_graph --
--in_graph=tensorflow_inception_graph.pb
--out_graph=optimized_inception_graph.pb --inputs='Mul' --outputs='softmax'
--transforms='
  strip_unused_nodes(type=float, shape="1,299,299,3")
  fold_constants(ignore_errors=true)
  fold_batch_norms
  fold_old_batch_norms'
One thing to look out for here is that you need to specify the size and type
that you want your inputs to be. This is because any values that you’re going to
be passing in as inputs to inference need to be fed to special Placeholder op
nodes, and the transform may need to create them if they don’t already exist. In
the case of Inception v3 for example, a Placeholder node replaces the old
Mul node that used to output the resized and rescaled image array, since we’re
going to be doing that processing ourselves before we call TensorFlow. It keeps
the original name though, which is why we always feed in inputs to Mul when we
run a session with our modified Inception graph.
After you’ve run this process, you’ll have a graph that only contains the actual
nodes you need to run your prediction process. This is the point where it
becomes useful to run metrics on the graph, so it’s worth running
summarize_graph again to understand what’s in your model.
There are hundreds of operations available in TensorFlow, and each one has multiple implementations for different data types. On mobile platforms, the size of the executable binary that’s produced after compilation is important, because app download bundles need to be as small as possible for the best user experience. If all of the ops and data types are compiled into the TensorFlow library then the total size of the compiled library can be tens of megabytes, so by default only a subset of ops and data types are included.
That means that if you load a model file that’s been trained on a desktop machine, you may see the error “No OpKernel was registered to support Op” when you load it on mobile. The first thing to try is to make sure you’ve stripped out any training-only nodes, since the error will occur at load time even if the op is never executed. If you’re still hitting the same problem once that’s done, you’ll need to look at adding the op to your built library.
The criteria for including ops and types fall into several categories:
Are they only useful in back-propagation, for gradients? Since mobile is focused on inference, we don’t include these.
Are they useful mainly for other training needs, such as checkpoint saving? These we leave out.
Do they rely on frameworks that aren’t always available on mobile, such as
libjpeg? To avoid extra dependencies we don’t include ops like DecodeJpeg.
Are there types that aren’t commonly used? We don’t include boolean variants of ops for example, since we don’t see much use of them in typical inference graphs.
These ops are trimmed by default to optimize for inference on mobile, but it is possible to alter some build files to change the default. After alternating the build files, you will need to recompile TensorFlow. See below for more details on how to do this, and also see optimizing binary size for more on reducing your binary size.
Operations are broken into two parts. The first is the op definition, which
declares the signature of the operation, which inputs, outputs, and attributes
it has. These take up very little space, and so all are included by default. The
implementations of the op computations are done in kernels, which live in the
tensorflow/core/kernels folder. You need to compile the C++ file containing
the kernel implementation of the op you need into the library. To figure out
which file that is, you can search for the operation name in the source
files.
Here’s an example search in github.
You’ll see that this search is looking for the Mul op implementation, and it
finds it in tensorflow/core/kernels/cwise_op_mul_1.cc. You need to look for
macros beginning with REGISTER, with the op name you care about as one of the
string arguments.
In this case, the implementations are actually broken up across multiple .cc
files, so you’d need to include all of them in your build. If you’re more
comfortable using the command line for code search, here’s a grep command that
also locates the right files if you run it from the root of your TensorFlow
repository:
grep 'REGISTER.*"Mul"' tensorflow/core/kernels/*.cc
If you’re using Bazel, and building for Android, you’ll want to add the files
you’ve found to
the
android_extended_ops_group1 or
android_extended_ops_group2 targets. You
may also need to include any .cc files they depend on in there. If the build
complains about missing header files, add the .h’s that are needed into
the
android_extended_ops target.
If you’re using a makefile targeting iOS, Raspberry Pi, etc, go to
tensorflow/contrib/makefile/tf_op_files.txt and
add the right implementation files there.
此处可能存在不合适展示的内容,页面不予展示。您可通过相关编辑功能自查并修改。
如您确认内容无涉及 不当用语 / 纯广告导流 / 暴力 / 低俗色情 / 侵权 / 盗版 / 虚假 / 无价值内容或违法国家有关法律法规的内容,可点击提交进行申诉,我们将尽快为您处理。


